怎么把图片缩小各种方法解决教程
不知大家有没有遇到过这种问题:就是图片太大了,占空间,要求把图片缩小。或者在有些报名网站上上传照片时,对照片大小做了要求,但是自己照片又大了,上传不上去。数码相机、手机像素又高,拍出来的照片基本上都是几M,想要点小的图片都不行,通常遇到这种情况该怎么解决呢?今天小编就告诉大家怎么将图片缩小。
方法一:利用Potoshop软件
Potoshop中有时经常放大缩小图片,由于不断改变分辨率就会造成图片变得模糊。此时,想要保持图片清晰度不变就需要应用到”置入“。
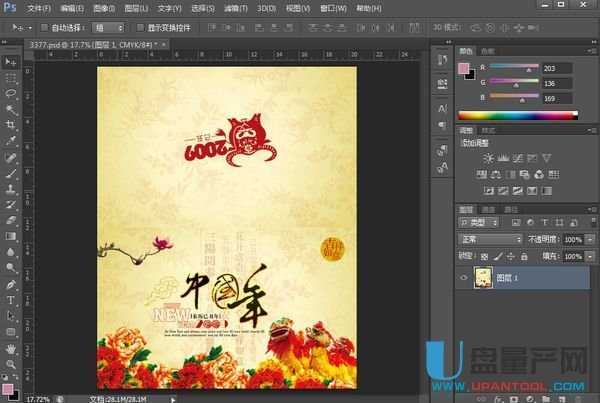
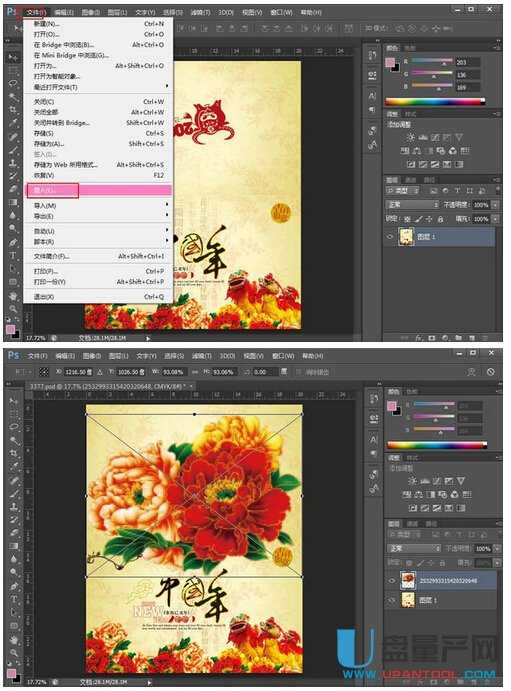
在Potoshop中打开要求缩小的图片。
点击”编辑“-”置入“。此时,按住Shift键拖动边框缩小即可。(置入的优点:任意放大或缩小,都不会改变图片的清晰度。)
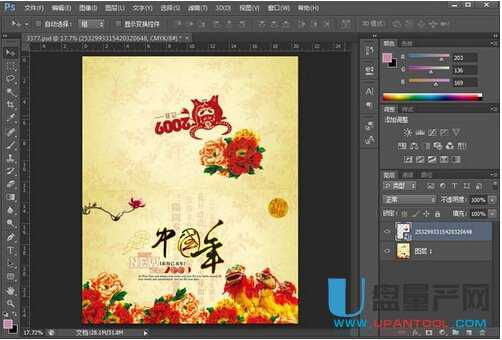
最终效果预览!
方法二:WINDOWS自带的一种缩小照片大小的方法
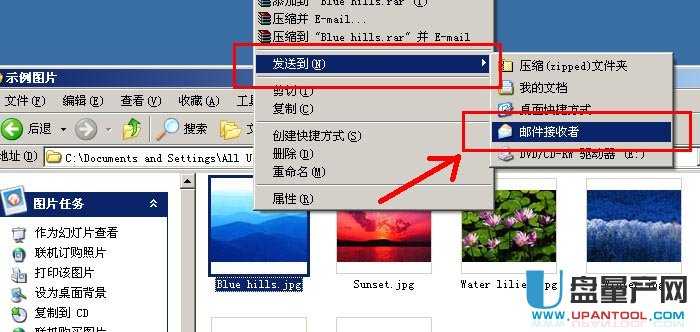
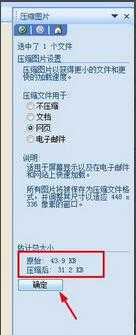
右键点击要缩小的图片(可以批量全选),然后选择发送到邮件接收者
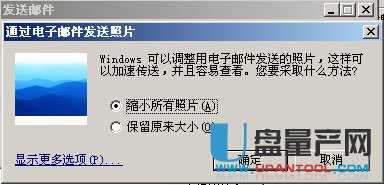
跳出对话框,选择缩小所有照片
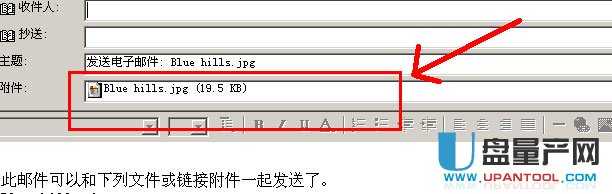
之后会跳出WINDOWS自带的邮件接收软件Outlook Express,将附件中已经缩小好的图片拖出来就可以了
方法三:
一般电脑默认都安装了windows的画图工具,而安装了windows XP 系统的画图工具已经可以保存jpg图片了。
点击左下角的“开始”---选择“程序”---选择“附件”---选择“画图”
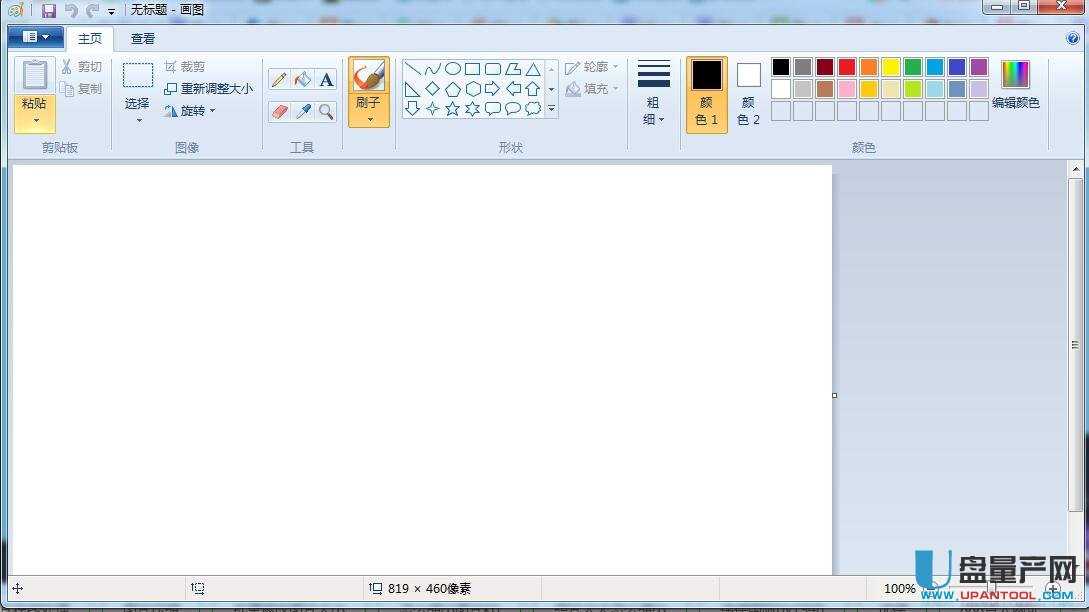
在打开的画图程序菜单栏的左上角,点“文件”---选择“打开”,然后选择需要缩小的图片文件
打开需要缩小的图片后,选择菜单栏的“图像”--选择“拉升/扭曲”

在拉升那一个选择有两个选项:水平(H),垂直(V),单位百分比。根据情况输入数值,输入50的话,意思就是原来的50%,输入20,就是原来的20%。水平与垂直的数值请输入一样,以保证不会变形。输入完毕后点“确认”
在选择“文件”---选择“另存为”,随意给文件起一个名字,【保存类型(T)】请选择“JPEG”,点【保存】就完成图片缩放工作了。
方法四:图片像素和大小不变的情况下缩小内存
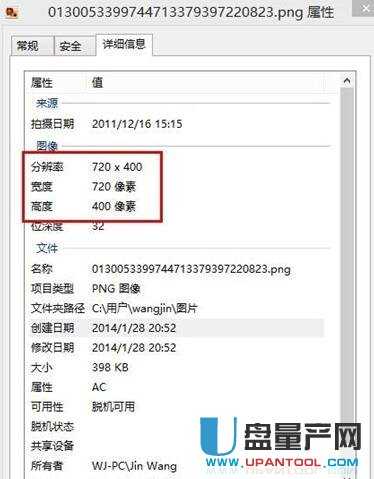
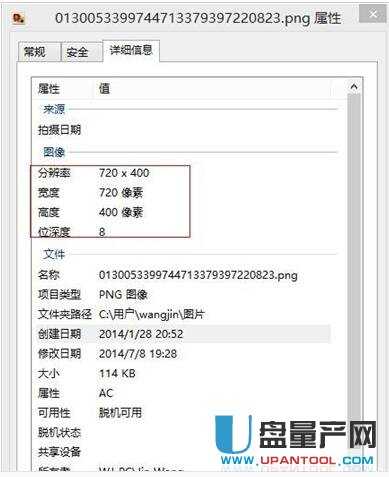
找到需要调整的图片→看一下他的详细信息
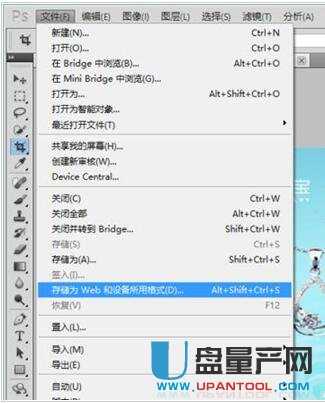
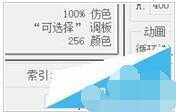
使用PS打开图片→文件→存储为Web和设备所用格式
选择PNG→调整品质大小→对应左下角有文件内存大小
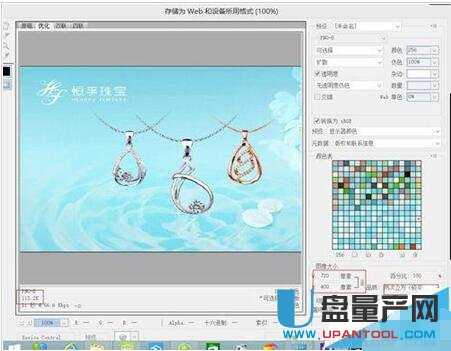
然后点击右下角的存储,我们同时发现像素也没有变化→依然很清楚
我们在看图片详细信息的大小,变小了许多吧!
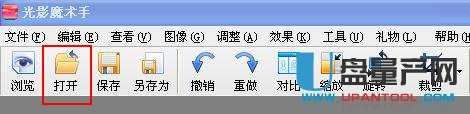
方法五:利用“光影魔术手“缩小图片
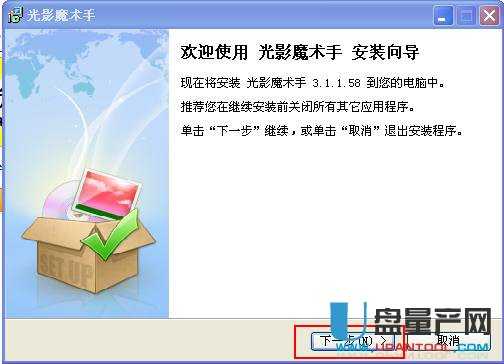
下载安装光影魔术手
用软件进行单个或多个图片的缩放。打开软件,点击“打开”
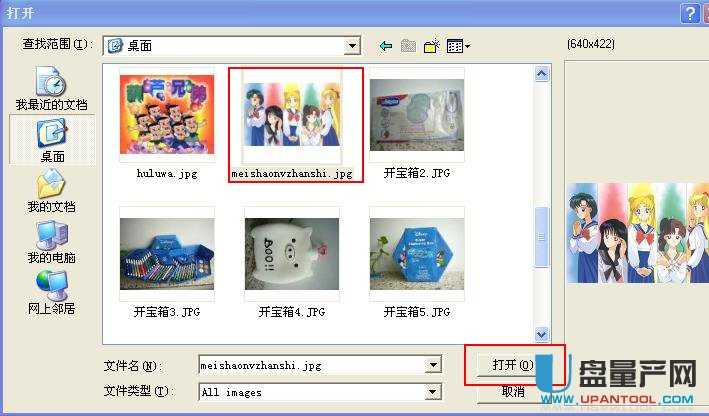
选择要缩放的图片,点击“打开”
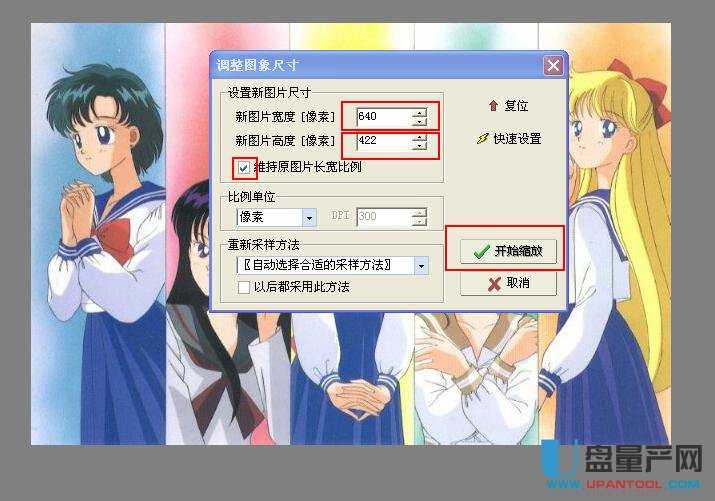
点击打开右侧数第六个按钮“缩放”

调整图中的数字,宽度和高度以550X550以内为宜,只要输入一个宽度高度会自动调节,(建议按比例缩放)然后点击“开始缩放”
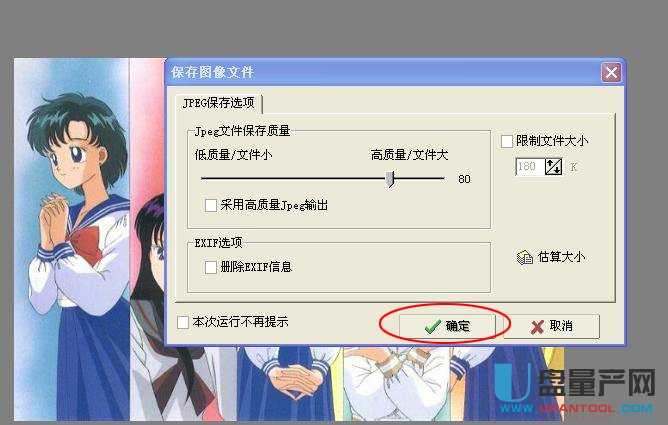
调整完大小后,点击“保存”,调整后点击确定,图片就压缩好了。

方法六:
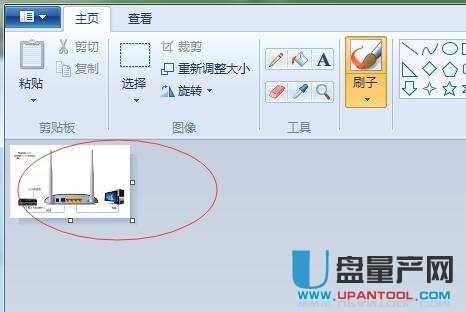
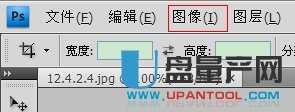
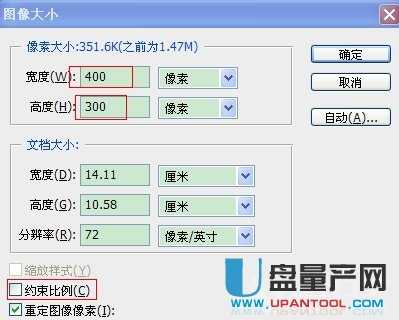
先把图片保存到桌面或者自己建的文件夹里,打开ps界面,双击空白处,打开图片。左键单击任务栏上方的“图像”——“图像大小”,会出来一个调整界面,我们将约束比例前的对勾取消,将宽度设置为400,高度设置为300。之后,单击“确定”。
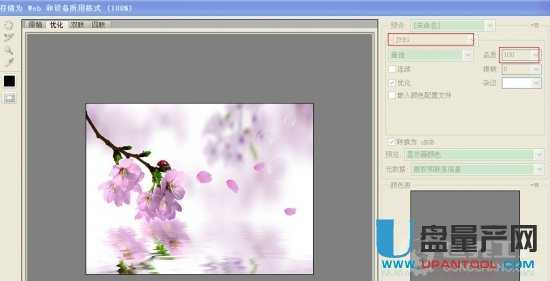
图片缩小了之后,接下来就是保存的问题,这时候打开“文件”——“存储为web和设备所用格式”,选择存为JPEG格式,然后可以通过调整右边的“品质”来改变图片的像素大小。这样保存出来的图片清晰度相对要高的多。
看一下最终缩小后的图片是不是依然很清晰呢!

方法七:批量缩小图片大小
首先需要新建一个文件,命名为“批量修改尺寸的文件”。
将需要修改的图片全部放入到这个文件夹中。
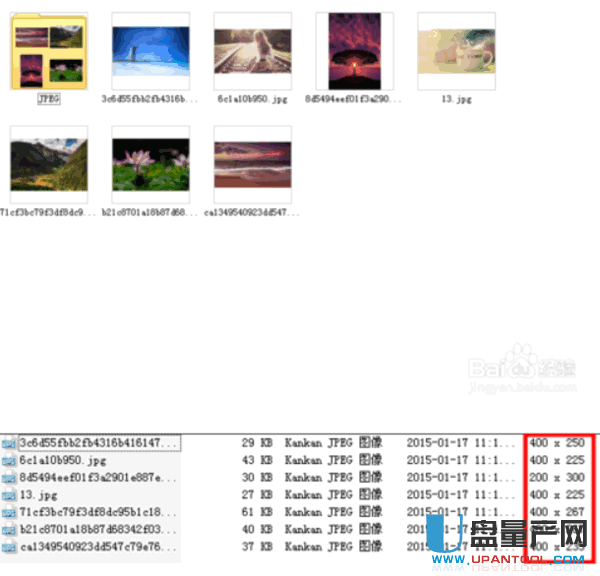
点击文件空白处,右键点击查看--详细信息,再选择详细信息中勾选尺寸,可见各个图片尺寸大小。
打开PS软件后,选择文件--脚本--图片处理器。
弹出对话框后对相应内容进行调整,选择需要处理的文件夹和需要存储的文件夹、调整大小以适合,点击运行。
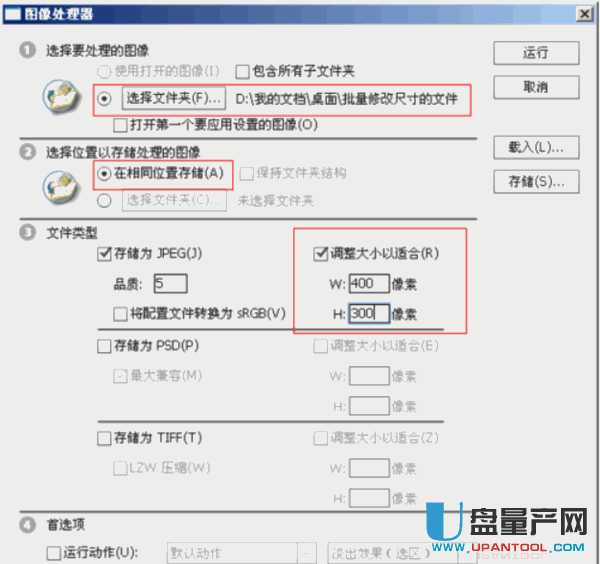

打开开始新建的文件夹,会发现多了一个文件,自动命名为“JPEG”,就是处理后的文件,点进去可以看到图片大小已经调整过了。
方法八:
启动ps,打开图片,选择菜单"图像"--"图像大小"
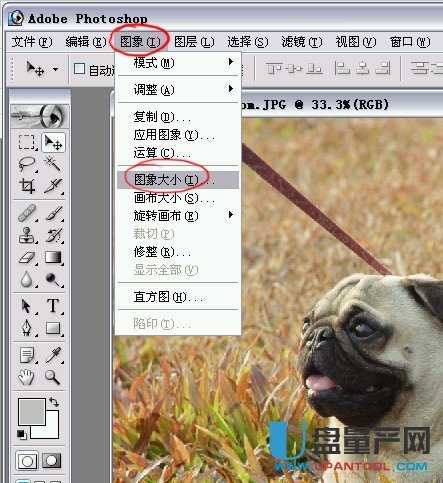
在这里我们可以看到图片的大小
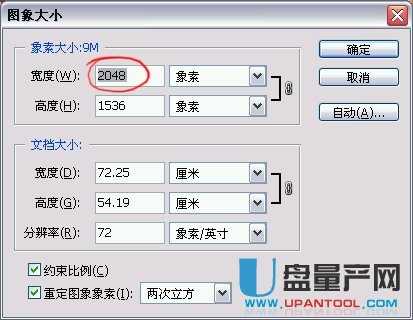
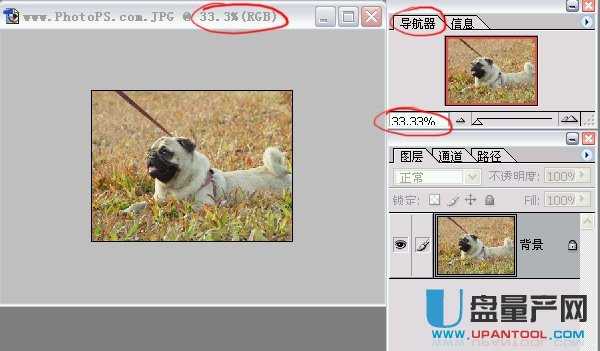
我们把那个尺寸改成 600(这个尺寸最适合绝大部分论坛的图片发布),注意下面两个方框的选取
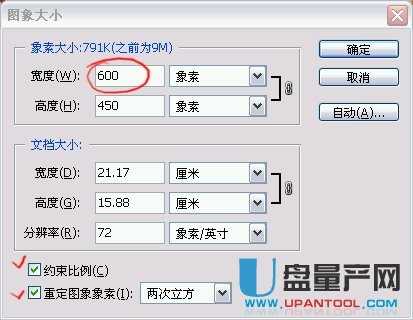
按确定后,图片变小了:(你会在电脑中发现图片太小,其实是电脑显示的原因,看我红圈的地方,电脑显示比例才33%而已。)
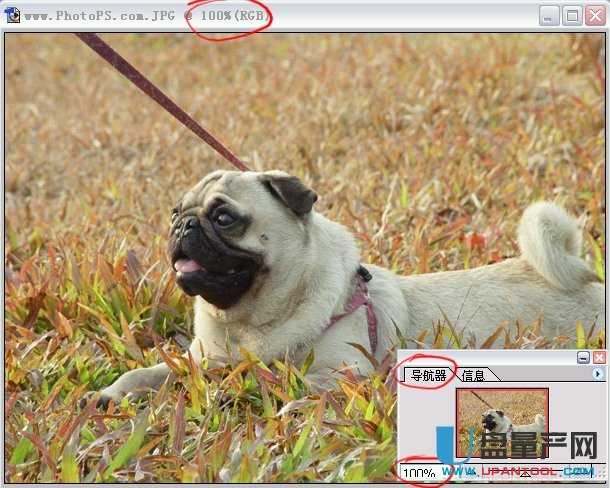
通过放大,你会发现图片其实并不小,在屏幕上观看正适合。(看我红圈的地方,电脑显示比例100%)
为了保留原大图文件,我们需要把这个压缩减肥的图片另存为
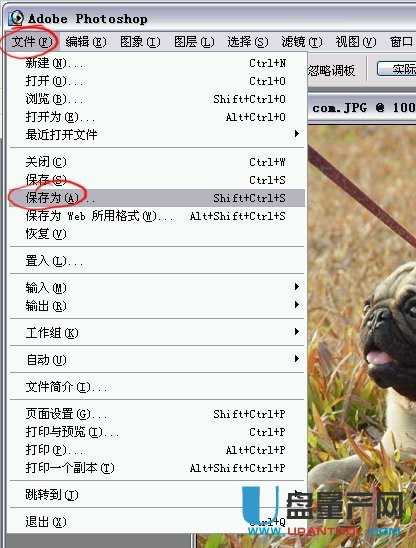
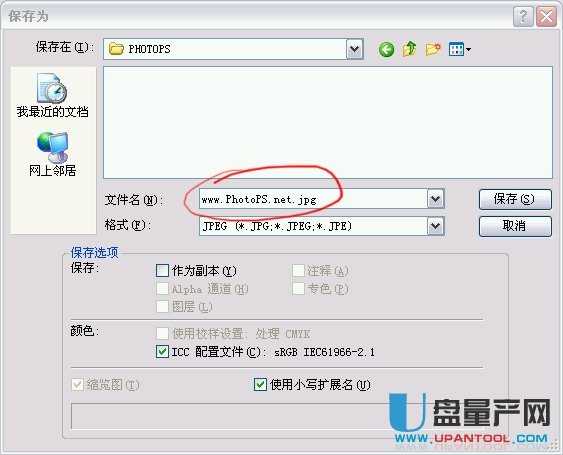
取一个与原图不一样的名字
把图像压缩品质调到 8 的位置(这个数字比较适合,损失不严重,而且压缩效果好)。
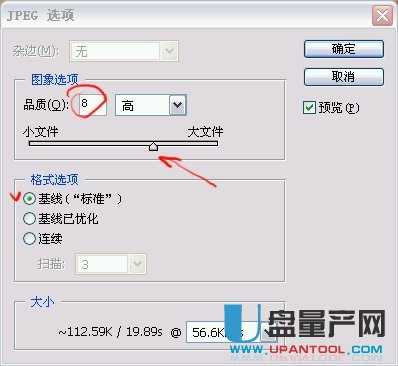
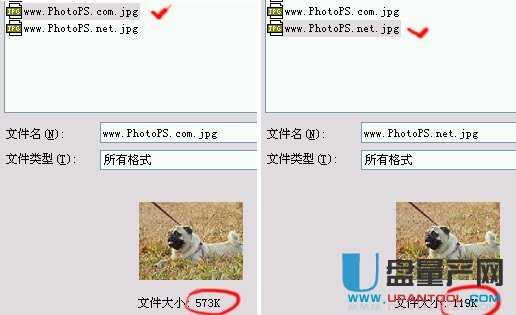
看看调整过后原文件文件和现在文件大小的差别
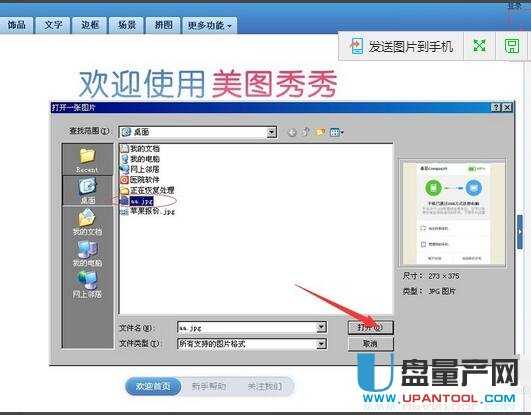
方法九:利用“美图秀秀”缩小图片
上百度下载美图秀秀软件,安装也很方便,直接执行安装文件即可。安装好美图秀秀之后你可以在软件右上角点击【打开】你的证件相片。右边菜单栏提供很多效果,当然你日常相片都可以使用优化。证件相片建议还是不使用。
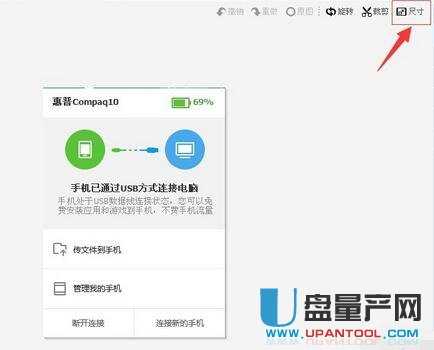
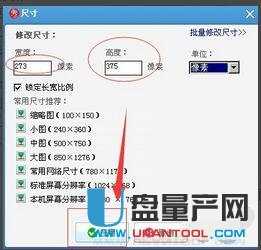
通常相片太大不能上传到你报名网站或者其他网站,原因都在原有相片尺寸过大或者文件大小超过上传限制。那么首先就要修改相片尺寸,点击“尺寸”,这里可以手工输入你需要的尺寸,一般来说你上传到某网站都会提示有规格,你手工输入就可以了。确定无误就可以点击“应用”。
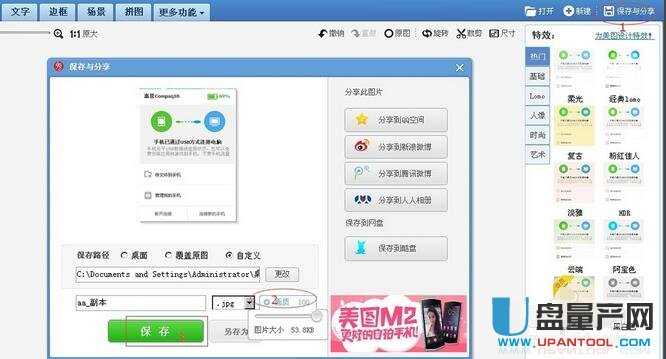
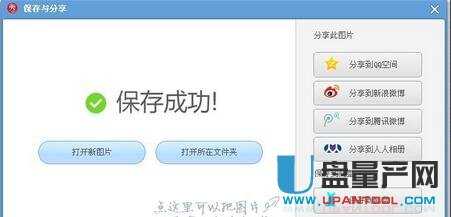
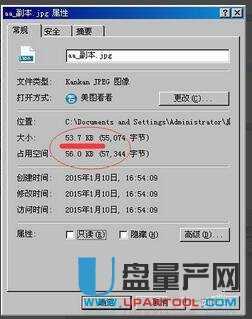
确定尺寸可以之后点击右上角“保存与分享”,修改保存路径,如“自定义”,点击“画质”,这里显示图片大小,如果你觉得还是达不到你要求,你可以往前调,需要注意是画质越低,图片大小就越小,图片质量也会越差,最好达到你网站上传大小即可。点击“保存”。我们可以看到图片尺寸以及大小都变小了。
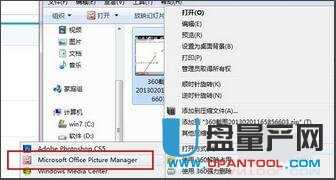
方法十:利用picturemanager
右键单击你要压缩的图片,在右键菜单中选择:打开方式--picture manager
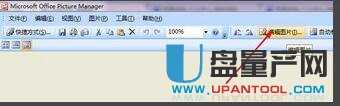
打开图片编辑器以后,在菜单栏上有一个图片编辑的选项,点击图片编辑
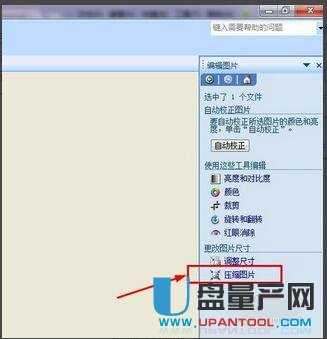
你会看到在右侧出现了一个新的对话框,这里有一个选项就是压缩图片,我们点击“压缩图片”

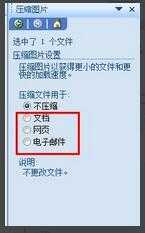
这一步要设置你压缩图片的用途,根据你自己的用途选择这个三个选项之一,然后在下面选择压缩按钮,压缩成功。
方法十一:AI怎么方法缩小图片
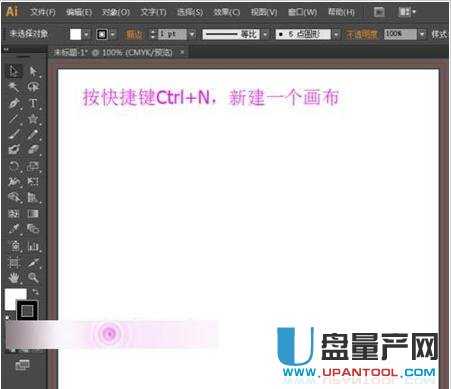
打开ai的软件,执行菜单栏中文件—新建,或者直接使用快捷键Ctrl+N新建一个画布。
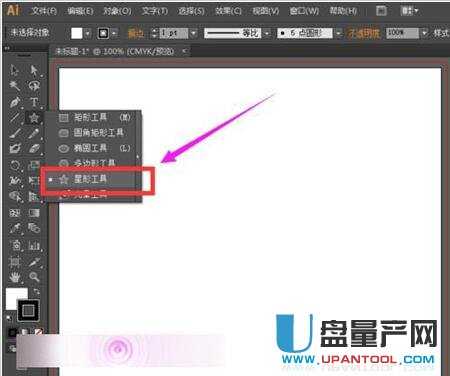
选择工具箱中的心形工具,将填充设置为红色,描边设置为无,然后鼠标点击拖动不放,上下方向键控制角度的多少,我们画出一个的类似太阳的图形
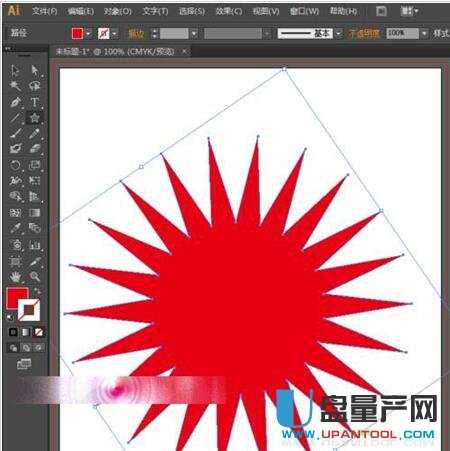
选择我们来讲这个图形缩小或者是放大。
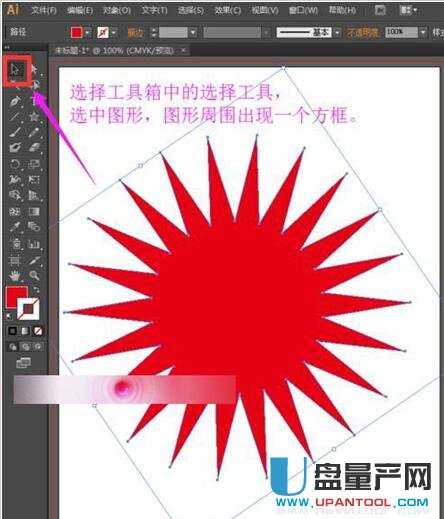
选择工具箱中的选择工具,选中这个图形,我们可以在四周看到一个方框,这个方框上每边都有三个锚点。
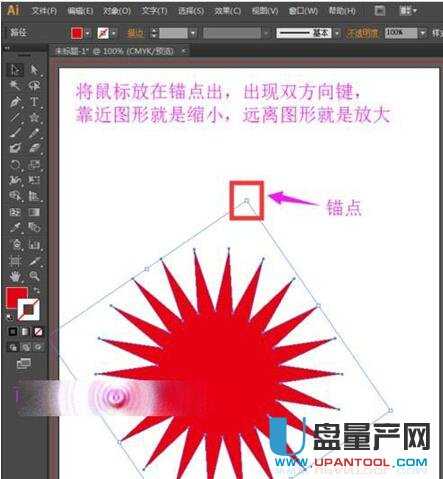
我们将鼠标放到锚点上,我们可以看到一个两个方向的箭头,直接点击向图形移动就是缩小,远离图形就是放大。
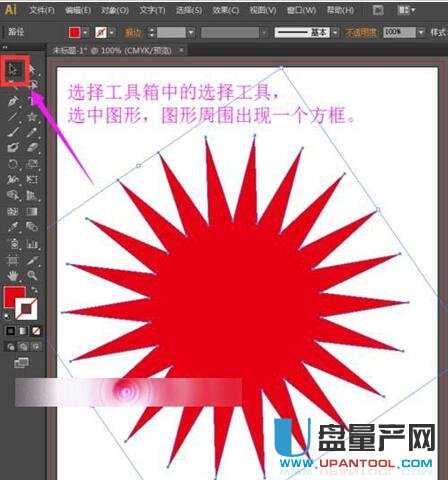
选择工具箱中的选择工具,在图形上点击一下,也就是选中图形,使图形四周出现一个方框
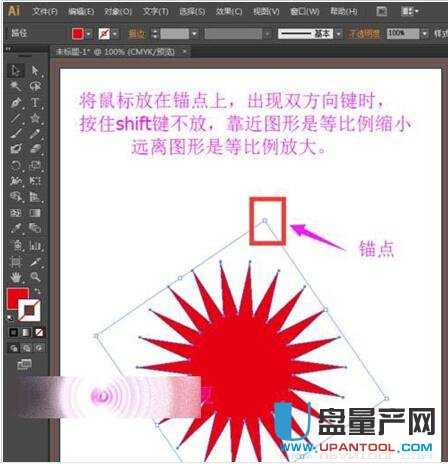
在有方框的前提下,我们将鼠标放在锚点处,按住shift键不放,可以实现将图形等比例缩小和放大。
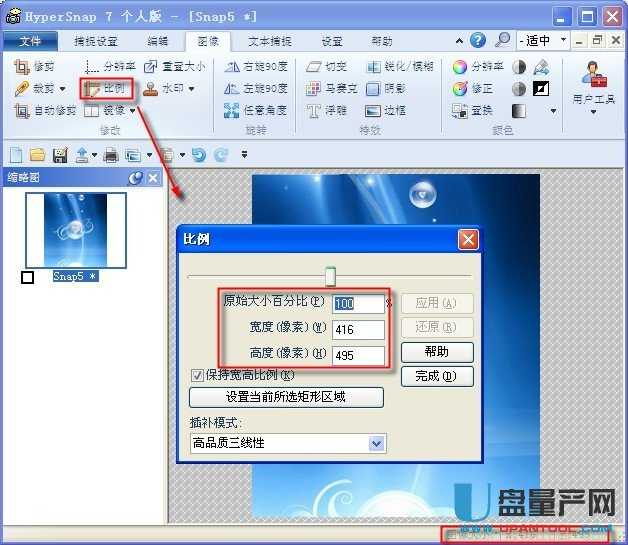
方法十二:利用HyperSnap实现图片按比例缩放
HyperSnap提供图片按比例缩放功能,在对图片截取、编辑之后,根据对图片使用的尺寸要求可直接将图片保存为同等的像素大小。从选取图片到使用,只要使用HyperSnap就可以全部搞定。

在任意位置截取一张图片之后,选择‘图像—>比例’选项,来调整图片按比例缩放。此功能可以按比例缩放HyperSnap工作区内的图像,以达到您想要的尺寸。按比例缩放时,您可以保持长宽比或者独立的更改会单个轴,这将导致图像扭曲。选择此功能后,将会出现一个对话框,您可以在此处选测原始图像的百分比来放大或缩小图像,或者是直接更改坐标轴的量。
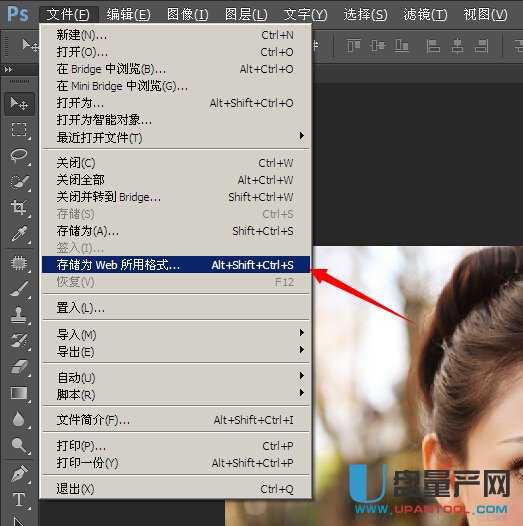
方法十三:pg压缩图片文件大小
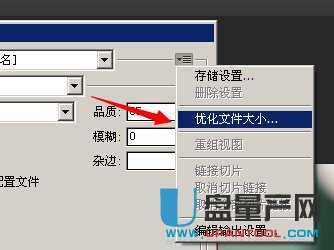
我们打开需要压缩的jpg图片。然后:文件——存储为Web所用格式
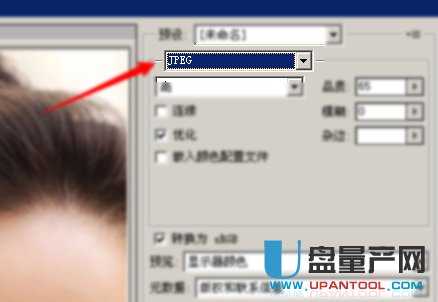
右上角选择JPG格式
然后在旁边有个很小的 下拉按钮
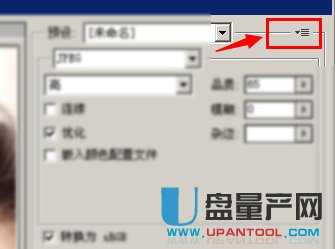
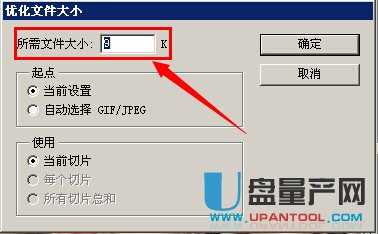
选择 优化文件大小
设置需要的文件大小(小技巧:假如你需要10KB以内建议设置9KB 假如需要100KB以内 建议设置90KB,知道啥意思了吧)